
JMDesigns: 3D Models |
My 3D model art portfolio.
|
Welcome to my 3D portfolio! Here is where you can see some of the 3D model pieces I've created
Stepping Up From Voxels
This basic item features voxel models made in MagicaVoxel, but it also includes some other kinds of model formats to be used in other programs.
Learning Blender Modeling
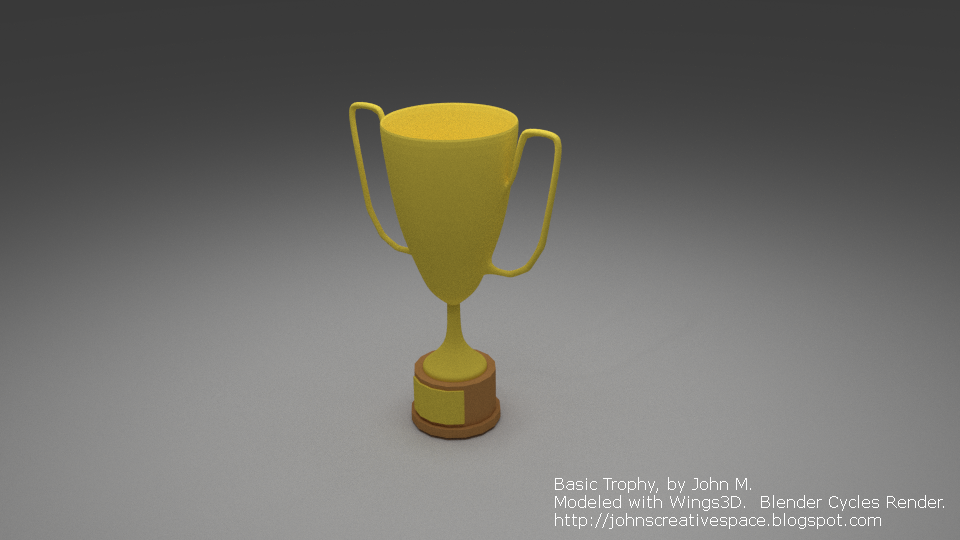
This model was created as a showcase of my 3D skills. At the time, I was trying to make my first 3D model, but failed so many times before until I completed this one. This was probably the turning point for me in trying to say I've successfully created a 3D model after almost 15-20 years of trying but coming up short. To make this even sweeter for me, I even made this as my first-ever successful render using the Cycles Renderer in Blender.

After trying to learn how to 3D model, I tried my best to make a model from start to finish using Blender. This is also the first Cycles Render I completed in Blender.
Learning SketchUp
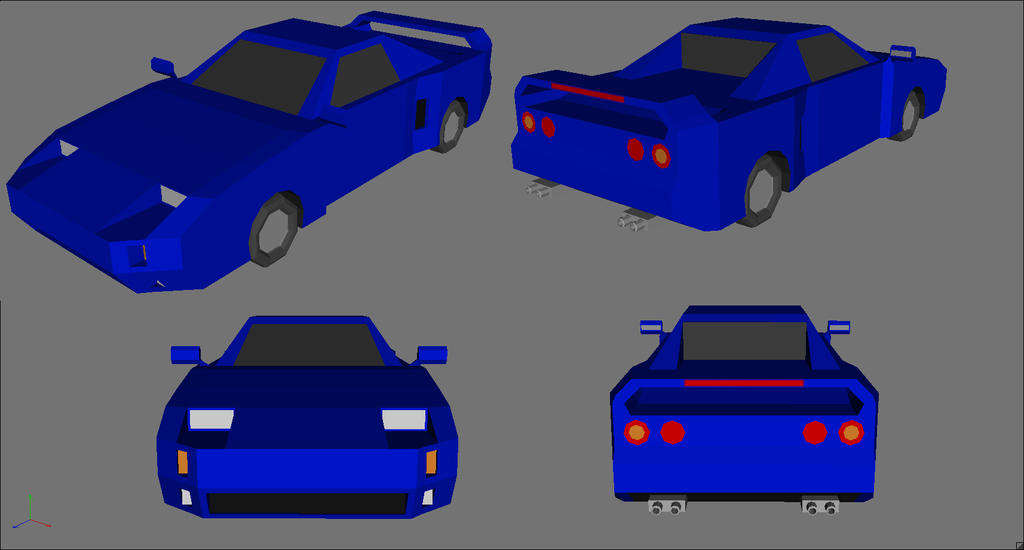
Next in my education of making 3D models was using a program called SketchUp. After some research on my part, I decided to download (then) Google SketchUp 8 Free. Making models through SketchUp is simple and effortless. Almost as if you can model... without even trying to model. It was primarily meant for CAD-style models, but many people have dared make various other models with SketchUp. And as you can see here, I offered my own effort with this car below:
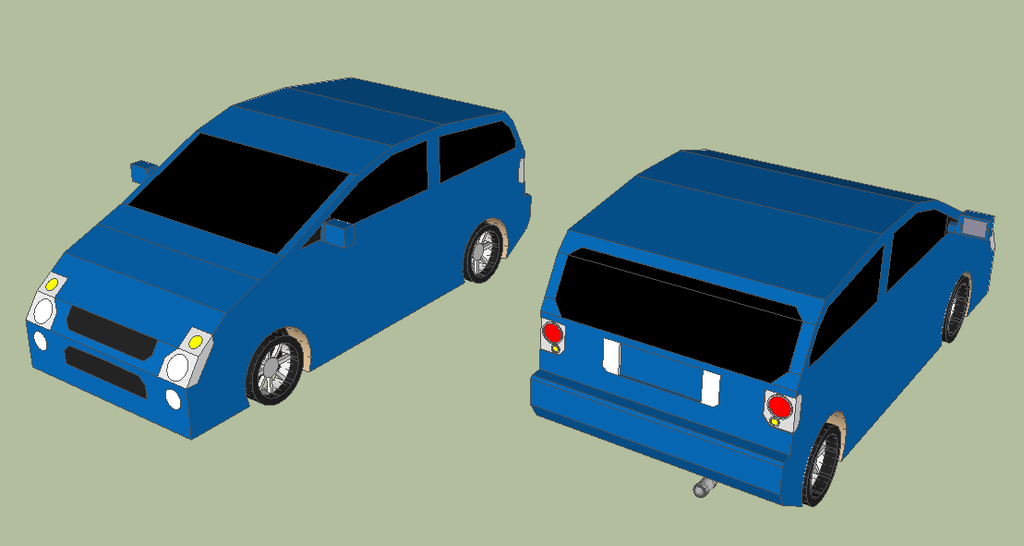
This was a car I created through SketchUp. SketchUp is great for creating models easily; however, it can be an absolute nightmare geometry-wise. Expect to clean up your models if you plan on making them available for more practical 3D applications (like gaming).
Discovering Wings3D...
While SketchUp was good for what it was, I felt I needed a more solid modeler. Maybe a modeler that gives me maybe not the huge toolbox of items for media, but something that could give me some new confidence in making models. I found that program in the form of maybe the most underrated 3D modeler today- Wings3D. What struck me most about Wings3D is how easy it is to learn how to model with. You may not be able right away to model something seriously detailed, but I found Wings3D to have a learning curve a bit greater than SketchUp, but tremendously less than Blender. I started to make models such as the sword above this paragraph. I would later modify this sword and add some extra triangles to the geometry of the sword, especially at the blade.
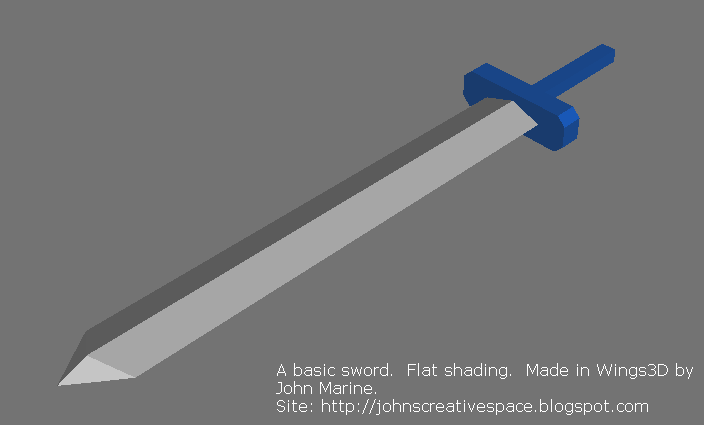
This was the original sword I created using Wings3D.
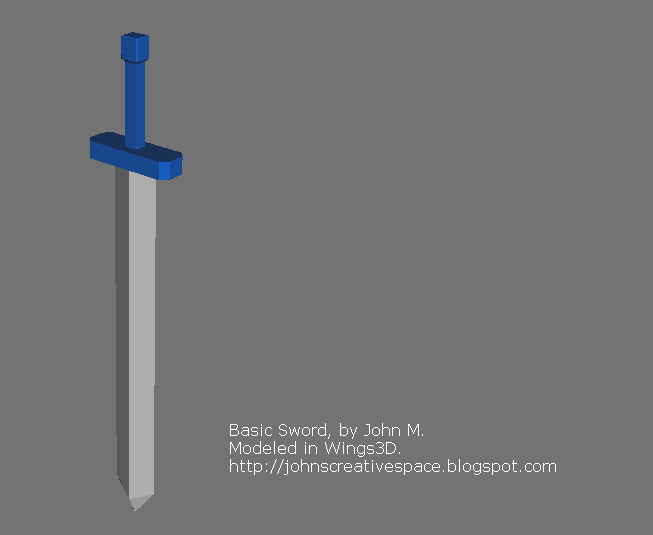
This was the modified version of the original sword I created. The only notable difference is the hilt design. The blade had more triangles in its design.
Another Trophy...
I managed to make one model in Wings3D that was previously incomplete. I made a trophy in Wings3D, but I eventually stopped developing it as I was unsure it would ever become a model I would be happy with. What I eventually did was make a brand-new version of my trophy model in Wings3D using some of the skills I learned in making models with Wings3D. I put those skills to good use and made a model I was fairly happy producing. You can see for yourself below:
After making one trophy through Blender, I took my skills to Wings3D to make this trophy.
The Car... I Didn't Know I Was Making!
This is a strange story. See the car above this text? This was supposed to be me practicing making a cartoon-style car. What ended up happening was me turning that toon car into this sports car! I got so indulged in trying to model a toon car that I eventually started trying to model this sports car. Previously, I have never been successful modeling a sports car in 3D. This one here is not a finalized model (believe it or not). I may work on it a bit more and maybe offer it for download/sale. For now, this is merely a weird circumstance where you make something other than what you intended to make or were supposed to make.
In a sense, this is like LEGO blocks- you buy a LEGO set to try to make whatever the box contains, but you don't have to build what the set is supposed to be. There were LEGO sets I have bought before that includes instructions on how to build other things. So you are not just limited to what you are supposed to make. That is the beauty of creativity.
Anyhow, this sports car probably should have never materialized... but it did.
Character Development
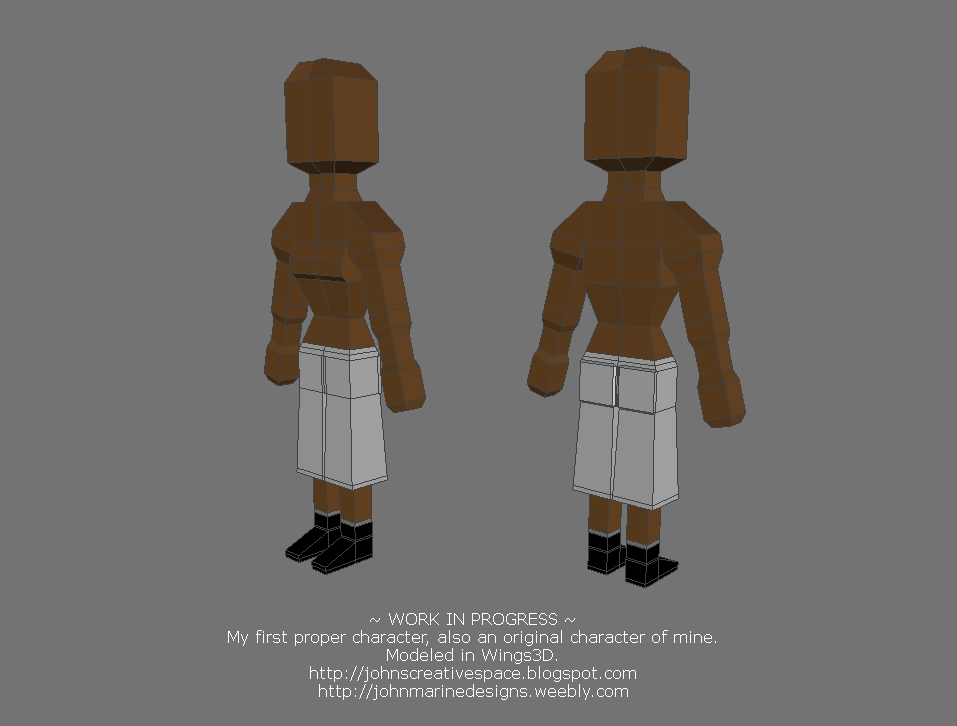
This was one of my first attempts at creating any kind of 3D character.
Making characters is a tricky task. It can be a simple task to make an inanimate character for a scene or for a render. However, I always felt bringing characters to life and making them realistic is more special than making a static character. I feel there is more worth in such characters than static models. This hasn't been the base of my issues in making characters, though. Still in my limited experience with 3D models is trying to model hands and heads. This, more than anything, is why I have struggled to make proper characters.
Anyone who has successfully modeled characters has mastered the use of making many edge loops and such to model out eyes, the nose, the mouth, and other features of head modeling. Those who have made hand models have made precise modeling to model out the fingers and thumb. I haven't had much success modeling out these things. On top of that, I mostly am not overly concerned with details. I tend to try to be detailed without being overly detailed. I am careful with my characters as I have been when I was making voxel models of my vehicles.
So what about my work-in-progress character? He is one of a few different original characters I have come up with. A good bit of the rough geometry was somewhat inspired by the in-game characters of Final Fantasy 7. The use of implementing materials with the colors has me interested in trying to UV map the model accordingly. Wings3D allows you to color parts of your model any way you like. That is what I have been doing for the longest. However, you can also use those same colors to map out parts of your model when UV mapping. So if you paint one part of your model blue and another in yellow, you can select those blue or yellow colors to specify what you want to UV map with. You can then specify the layout for which you want the UV mapping to be done with. With this model, I am leaning towards UV mapping this character's shorts. Maybe I plan on UV mapping his boots also. If I'm good enough, I may even just consider UV mapping his body and his head.
I mostly like making human models. Despite this, I have had interest in some animal models and maybe some fantasy creatures. This is still a fine start in making any kind of character.
Character Development 2
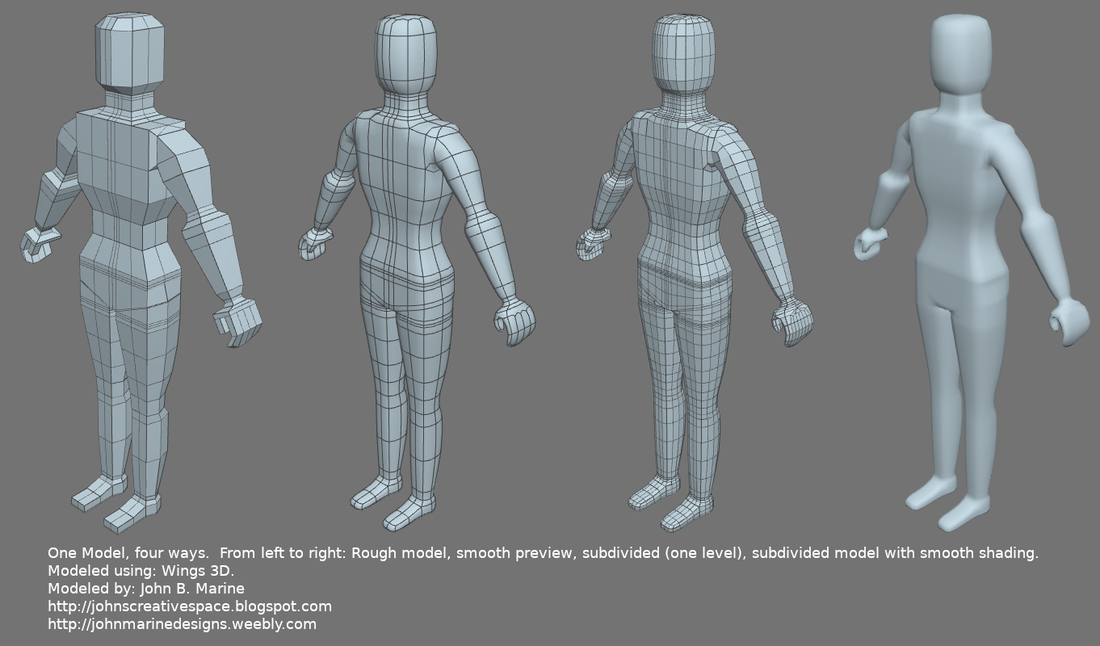
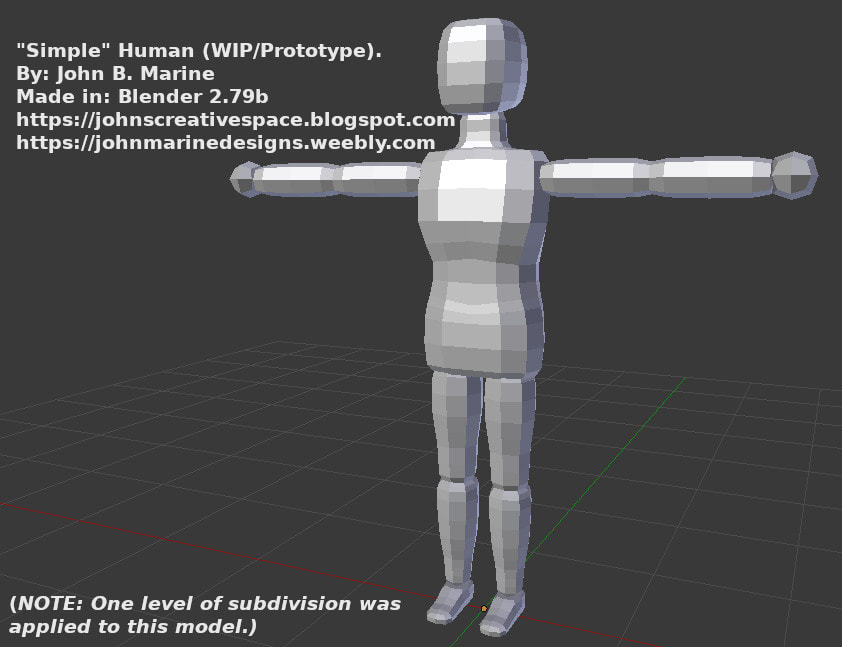
This is a more concentrated effort towards modeling a proper human. I did not care about proper human dimensions and features here.
After learning some new 3D modeling techniques, it was best to try to apply them into my work. After all, you can not become any kind of master if you do not practice your techniques. So I tried my hand at making a 3D human model. I did not care about accurate proportions; all I wanted to do was make a fairly decent human model. The model was somewhat supposed to be a female model. What you see is the work of going from a rough model to something fairly decent upon shading and subdividing.
In somewhat of an interesting twist, I decided to work with an A-Pose for my human model as opposed to a T-Pose. I had animation/rigging in mind when I came up with trying to model this human. I would prefer a T-Pose because it would be easier for me to set up when building an armature for it. I was trying to divide the model in half until I realize I didn't have a line on the head. Not having that connected edge prevented me previously from being able to Loop Cut the model to divide it in half in Wings3D.
• The model on the far left is the rough model. While the rough model is sort of fine on its own, I felt for better definition of the crotch, buttocks, and chest, I needed to apply an edge loop down the center of the torso. I then beveled that center line and added another edge loop at the center of the torso.
• The center left image is of the smooth shading preview of my rough model. This gives you a preview of what the model will look like if/when you subdivide it and apply smooth shading.
• The center right image is the model actually subdivided. Just one level of subdivision was applied.
• The far right image is the subdivided model with smooth shading applied.
One fact about this model is that I actually had to re-do it because I had some problems with trying to remove some of the model's geometry to clean it up. I have not mastered making proper dimensions and features to make this human model more believable. I still have a lot to learn in trying to make a realistic head. But again- I didn't care about perfect human proportions making this human model.
Motorcycle Modeling Practice
As much as I try to admire automobiles, I also try to be a motorcycle fan. Though I try to improve my 3D modeling skills (especially lately), motorcycle modeling is more advanced to me and beyond my current 3D modeling skill level. I did try to make a simple motorcycle through a series of box modeling. This box modeling includes extruding faces and even subdividing faces. Through my early attempts, I came up with this. I used a side profile image of the Suzuki GS500F as my base. Take a look:
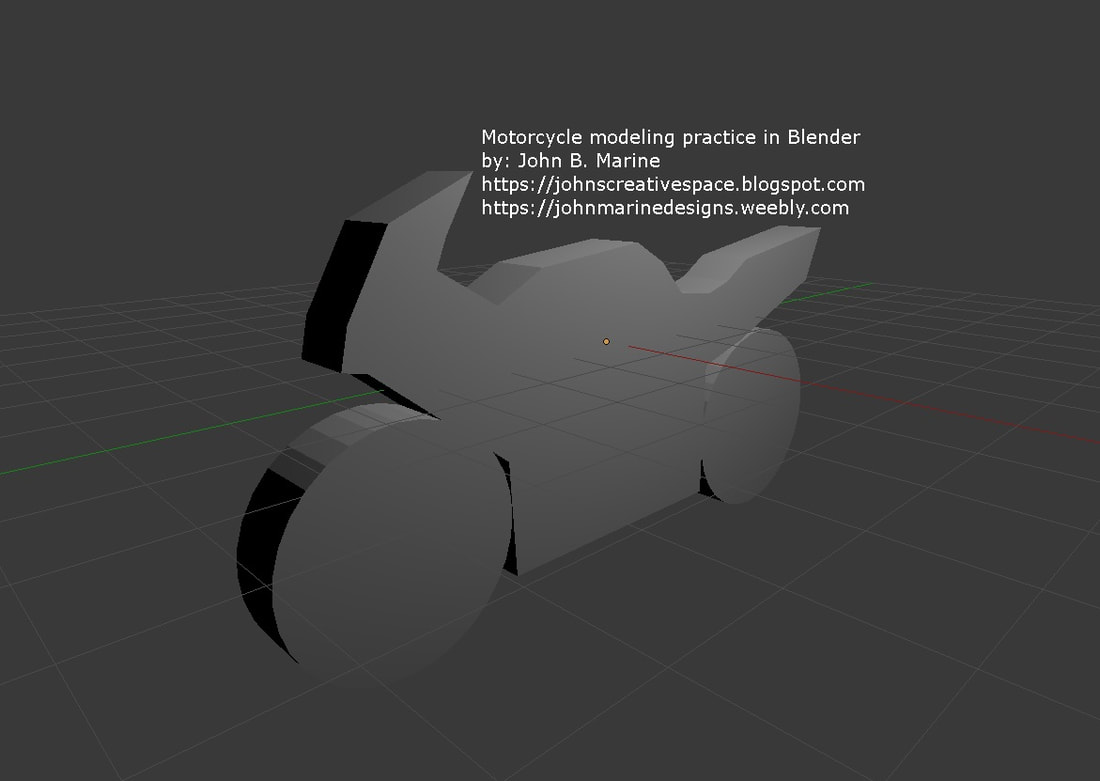
Based on a side image of the Suzuki GS500F, I attempted to model a simple sport motorcycle.
Low(?) Polygon Modeling Attempt
It is important in game development to know your budget as far as polygons are concerned. Recently, I tried to practice low polygons while also slowly developing a certain project. So what I did was take one of my voxel vehicles and tried to make a polygon version of it. Because I had already designed the basic geometry of voxel vehicles, I could simply take some of those meshes and smooth them out to make more stylish machines. However, I didn't want to make things THAT easy. I actually wanted to take those voxel vehicles and try to make completely fleshed out 3D versions of those voxel vehicles. This picture represents a work-in-progress of the crossover SUV from my voxel vehicle pack:
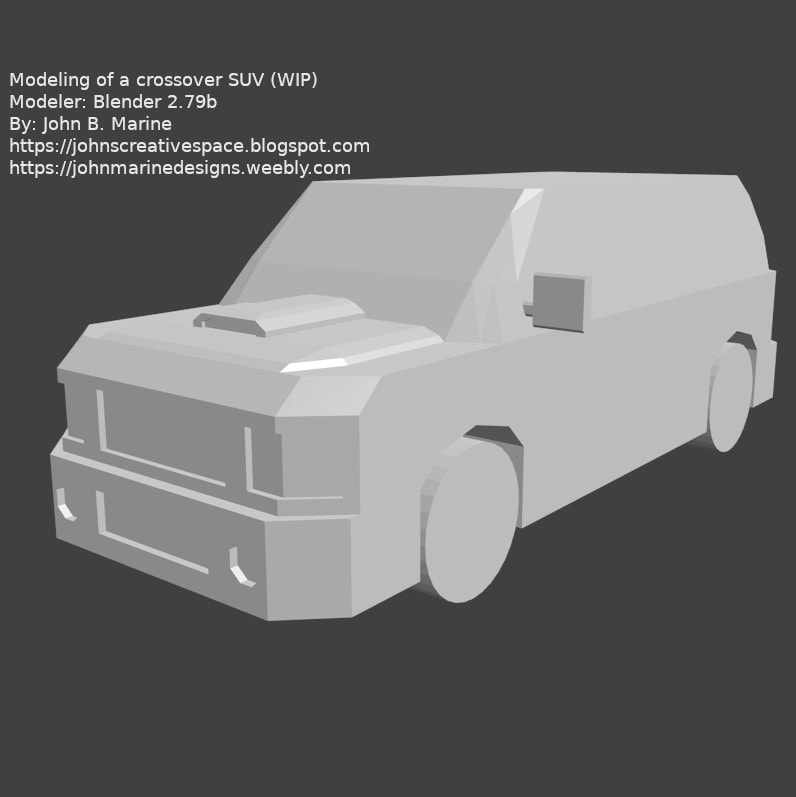
Unsure of how to actually execute low polygon modeling, I attempted to work on my reimagined crossover SUV from my voxel vehicle pack.
Low Polygon Modeling Practice... That Became Something More...
You know how they say "time flies when you're having fun?" Well, this was supposed to be an attempt to model something low-polygon. What ended up happening was me taking what was supposed to be a low-polygon model and further refining it. I start applying techniques that I learned and wanted to practice. I used Blender's Mirror and Boolean modifiers. I feel my proudest accomplishment was in designing the tires and the wheels. So in an attempt to practice low-polygon modeling, I failed. I did, however, succeed in making this draft model. What was supposed to be LOW poly ended up being this [still relatively low polygon model]:
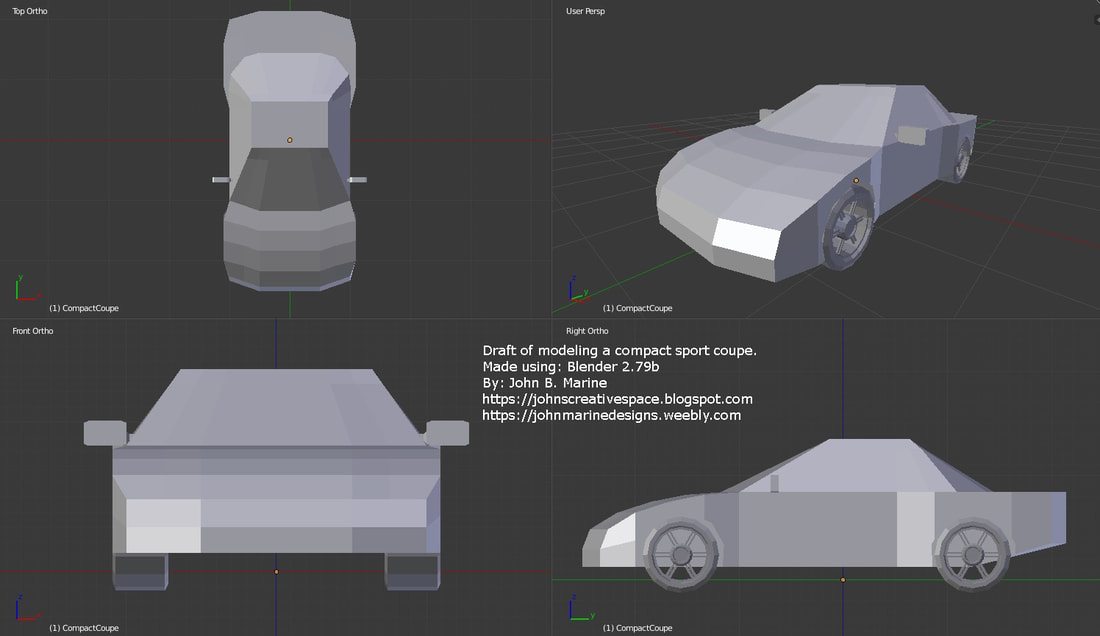
Trying to make a low-polygon model, I got carried away with the model and liked what I was creating, so what you see here was supposed to be LOW-poly.
Design Study: Designing a 3D Race Track
I tried to develop a makeshift 3D race track to potentially make into a track for a 3D racing game. It may also be implemented into a proper game engine. Years ago, I had announced having interest in making a track for rFactor. I did not know how to try to model a track. It was something I never done before, at least trying to make a practical one that can be used in a game. So one method I tried to implement was design a small-scale model and then scale it up considerably to something close that could be implemented into a game. I began with a flat mesh plane at the regular 2x2 Blender unit size and then scale up the road by about 12 times. I then made one cube and perform loop cuts and extrusions to resemble a garage. That cube was scaled up to simulate a track with multiple garages and pit stalls. Finally, I took another cube and made it into a makeshift car. I did NOT scale this cube, though. What I did do to it was give it two spot lamps to simulate headlights. The sum of all of my work is expressed in this design study I did:
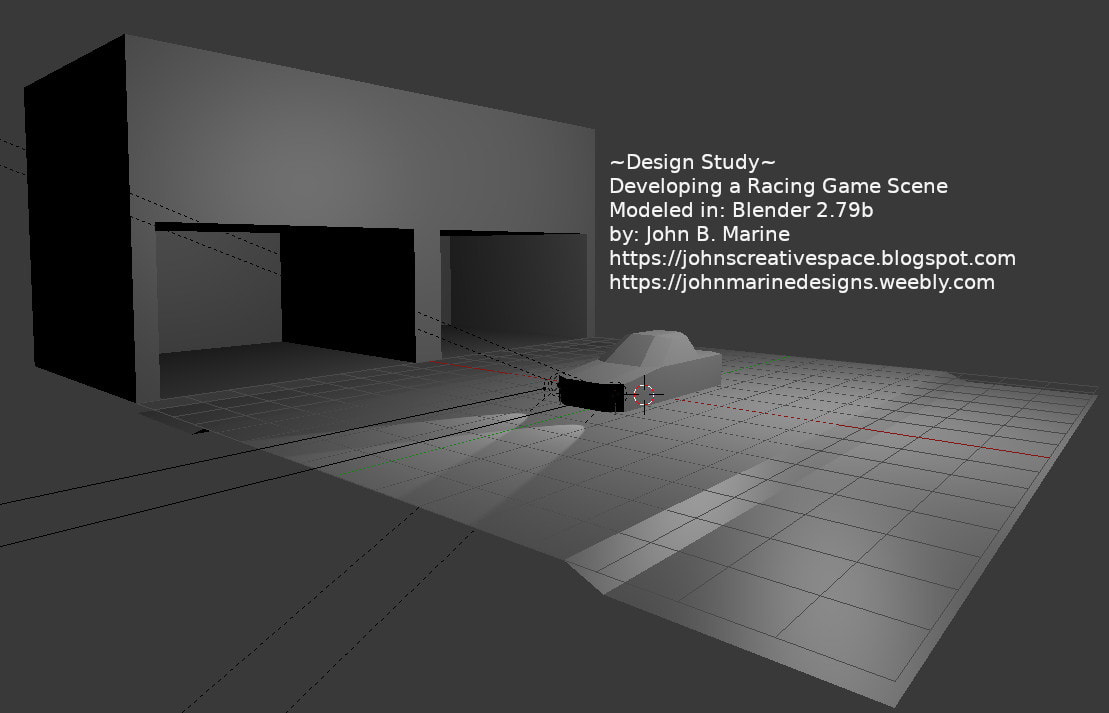
This was a practice scene to develop a practical model for a 3D racing game.
I hope to further expand upon this to develop more practical material for various racing/driving games. I had GTR2, rFactor [1], and Assetto Corsa in mind here.
Low Polygon Nature
I seemed compelled to try my hand at making various 3D assets for natural scenes. Of course, I focused on low-polygon assets as I am not ready to try anything highly-detailed yet. I am not someone who has enjoyed cartoon-style material. For instance, I was never the type to dabble with big-head characters. While I am not into cartoon-style material, I also am not into hyper-realistic either. You could say I have always tried to be the middle ground type. I learned one technique when developing these nature assets. I learned to take advantage of adding meshes within certain objects. In the past, trying to make one object in one mesh would sometimes lead to some issues in trying to subdivide or color individual elements. So in using Blender, I still had one single object, but I added extra mesh shapes that can be easily controlled and modified without needing to separate them into separate objects. Consider the following...
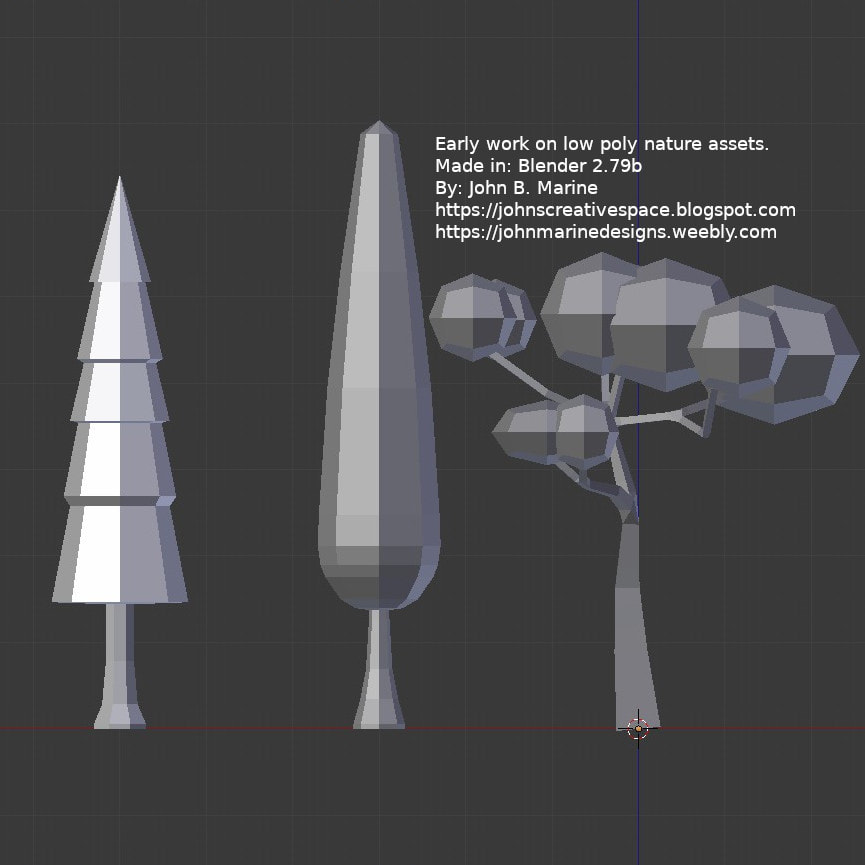
These nature assets were developed as I learned to make single objects out of separate meshes without breaking them up into separate objects.
What I mean by "separate meshes within separate objects" is that I first developed the tree trunks followed by using other meshes to use for the leaves. The three trees are individual objects- no parts from any of these three trees are separate objects. Each mesh arrangement are their own separate meshes, but they are not separate objects. From an experiment I once did, I noticed I was using fewer faces and triangles by using an object with unconnected meshes than I was in making from connected meshes. Sometimes, using unconnected meshes can provide better control when doing things like subdividing or vertex coloring.
Do you still need to separate meshes to separate objects? Yes. For example, you still need to separate wheels of a vehicle if you plan on using a vehicle that can be operated. You also have to separate mesh parts that can be animated or should be animated (such as doors, the hood/bonnet, the trunk/boot, steering wheel, etc.). Just that something like these trees I modeled can be made simpler by modeling one object consisting of the tree trunk and all the leaves. When it comes to selecting loose meshes in Blender, you hover over the mesh piece and press "L" to select the entire loose mesh. You can press "L" for all loose mesh elements. Be careful to deselect using "A" when you're done so you don't unnecessarily select multiple loose meshes performing some other operation.
I continue to find ways to maximize my Blender skills and even get into a bit of a groove or zone.
"Cheating" Voxels?
I learned some techniques from one YouTube video as the creator made a Minecraft model based on a proper image. If you have used Blender before, you can use the Images as Planes (granted you have enabled this feature). The modeler took a Minecraft skin (uploaded as an Image on Plane) and was able to put together a Minecraft model through a unique and fun folding method. When I tried this myself, I initially made an image of 64x64 proportions in GIMP and tried to piece together my own model. I was rather successful!
As I later wanted to try this method in a different way, I tried using a mesh plane in Blender and then subdivide it into a 16x16 grid. When I tried to make something close to my original creation, I paid special attention to the measurements of the square edges. Blender has a feature that allows you to measure the edges and faces of models as you select certain ones. Once I learned those measurements, I tried to extrude some of the faces to that measurement length. This allowed me to consider making simple cubes followed by extruding extra faces to form more complex voxel shapes. This got me to try to re-create one of my voxel models through Blender.
Taking my newfound knowledge and skills, I tried to re-create one of my past voxel character models. I took one mesh plane and subdivided it into a 16x16 grid. I then made five extra copies of the subdivided plane to represent different parts of the model's body. I made mesh planes for the torso, head, limbs (to be duplicated), hands (to be duplicated), and feet (to be duplicated). Once I did all the folding techniques, I made something very close to my original voxel model. When I did the torso, I did some extra extrusions that I otherwise would not be able to make using this folding method. The same thing had to be done for the head and the hands. There is one thing that is absolutely important in this method I learned. The most important thing to do when done with this method is to Remove Doubles. A lot of extra vertices will need to be removed to enhance the geometry and make the geometry more useful. Once I was done modeling, I then assembled the character piece-by-piece. I needed to put the origins of each model piece to their proper positions for the model to look correctly. Once I was done, I felt very accomplished! See for yourself:
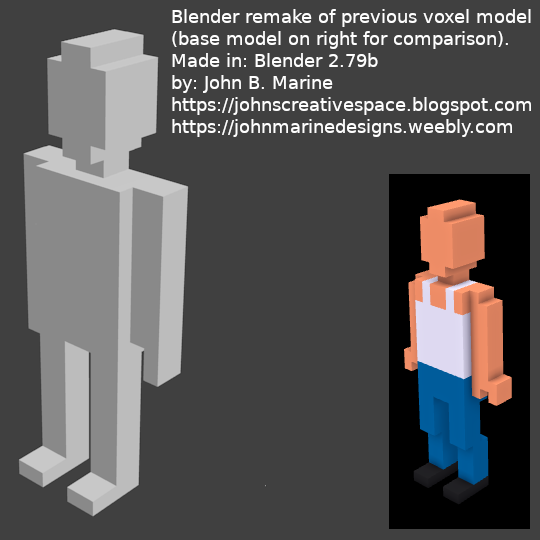
Through a unique folding method I learned to do in Blender from a YouTube video, I re-created one of my old voxel character models to near-perfection. I also re-imagined my old model. So that is why my Blender re-creation looks a tad different from the original voxel model.
Now you may be wondering... "why do I call this as 'cheating' voxels?" Well, once a voxel is converted to a proper 3D model format, it is no longer a real voxel-style model. Let's face it- a voxel image is just a series of small cubes. Even Minecraft has a bunch of cubes and rectangular prisms while maintaining a blocky and low-resolution aesthetic. What I've done was essentially make a voxel-style model not from an original voxel. So in a way, I feel like I have "cheated" voxels by making voxel-style models. Another aspect of voxel-style models is that they are perfectly grid-based. So if you want to make diagonal style polygons, you could take the original mesh and re-work things to your liking. Because of the versatility I have created in designing this Blender model, I could use it to make an enhanced version of my old voxel models, or I could use this to be a base mesh to flesh out more detailed models. This is a lot of leverage I am giving myself to have a chance at developing many different voxel-style models. Either that, or leverage in terms of taking a voxel-style model and making more precise 3D modeling afterwards. Either way, I can do a whole lot now with these models!
More Practical Race Track Modeling...
In between trying to learn to develop material for games and simply improving my skills in developing content, I am faced with somewhat of a dilemma. I have reached a point where I am thinking of now using Blender to develop a driving model followed by modeling tracks to get a realistic view of how they'd perform. So I had the hankering to develop an off-road track. I only have gotten into somewhat of a prototype stage. When I say "practical race track," I mean something that can be dropped into game engines and into games themselves. I am looking for these to be implemented into GTR2, rFactor, Assetto Corsa, and more. The most important thing here is that I am learning to use proper measurements with my work. Since Assetto Corsa uses meters, I am learning to utilize meters. This is a big issue for me as I am more used to Imperial measurements (feet, yards, miles, etc.). All this is here is a prototype. I haven't developed it too much further to where it is game ready. All I have a layout. And here you go...
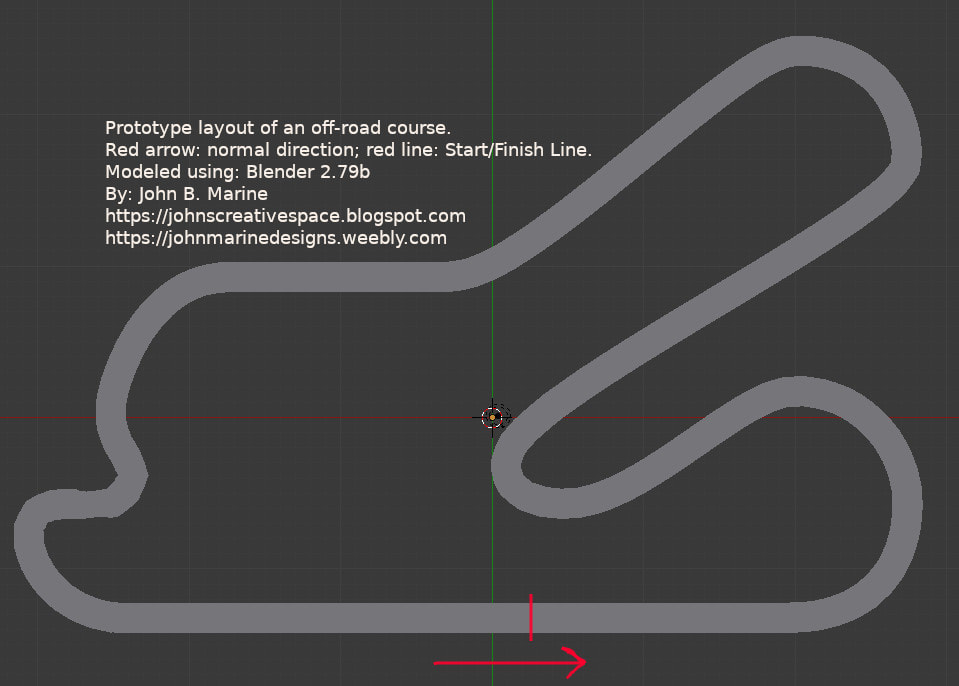
This picture is merely a prototype of an off-road course I developed. It may end up being something I test in Blender 2.79b using Blender Game Engine.
Very Low Polygon Vehicle Practice
Having as few polygons for models as possible vastly improves performance. In the case of mobile devices or weak computers, low polygon work can make a huge difference. I decided to try some low-polygon modeling when I saw some low-polygon cars on Turbosquid. One such modeler offered a series of low-polygon vehicles that had about 1.1K tris/triangles to each of them. Having few polygons means you have to keep details to a minimum. Still, you want to make something of quality having a low budget for tris/polygons. Here is what I came up with in about half an hour:
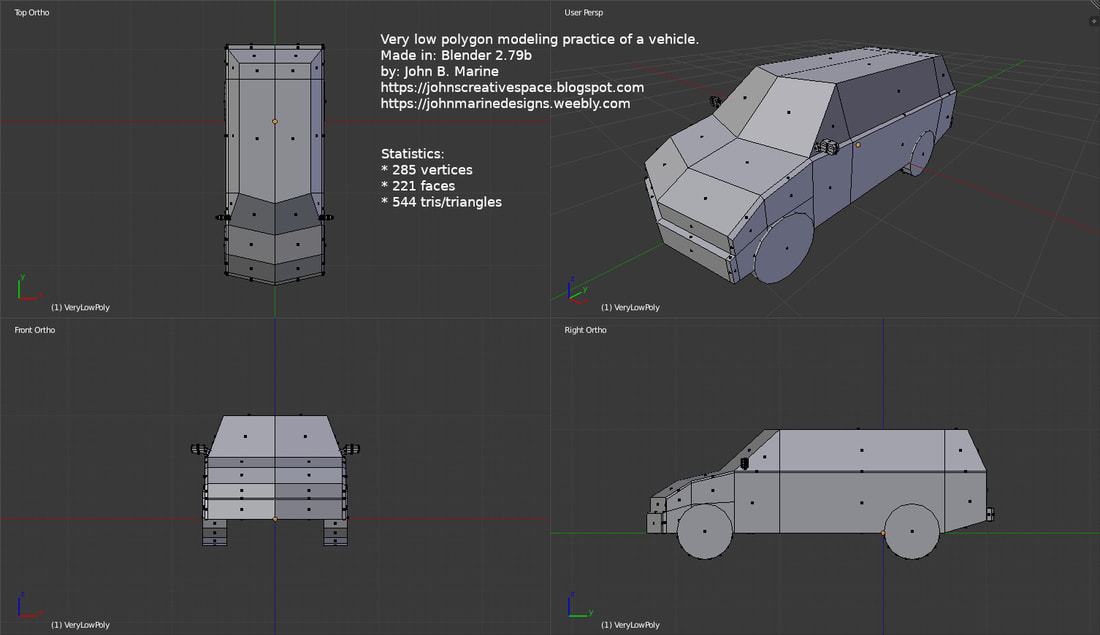
This was practice in making a very low polygon vehicle. The entire vehicle is one object, and the loose meshes include the wheels and the side mirrors. This was made in Blender, and the pictures are included in Edit Mode so you can see the geometry.
Low-Polygon, Low-Resolution Modeling; Tiling Practice
Progress! I practiced making pixel art and then using a bunch of plane meshes to build a simple room. The room is incomplete in design because this was simply to practice using a single texture atlas along with using plane meshes to build a simple room. What I could have done was take textures someplace else and use them. However, I chose to be original and make a rudimentary room using GIMP for textures and Blender for modeling. I had to adjust a number of render settings to get rid of some of the different lines that appeared in renders. One other important element is to remove doubles. Otherwise, you'll have a lot of mess putting these designs together. This is actually influencing me to attempt some bigger and better designs. But again- progress! Check it:
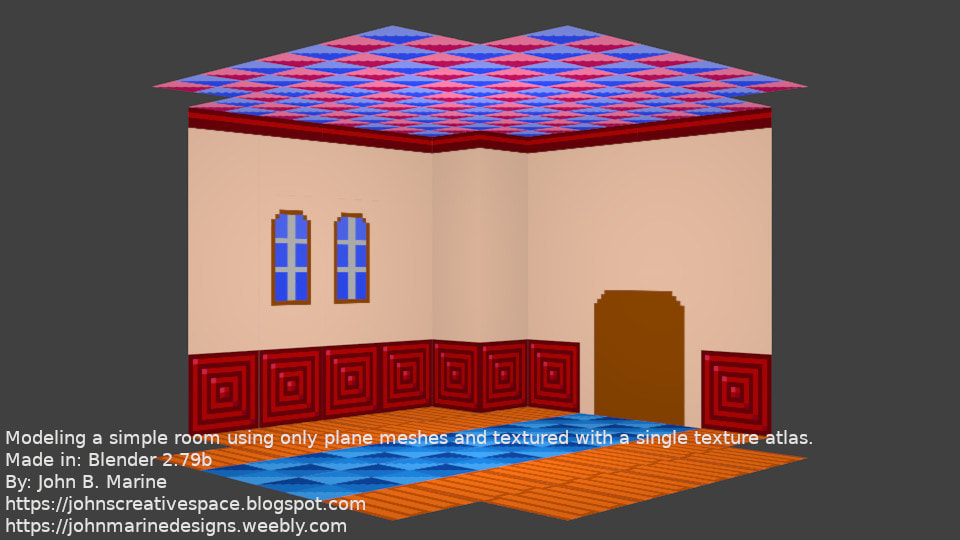
This is a rudimentary room created using plane meshes in Blender and with some simple art made in GIMP. This is actually really progress in potentially trying much bigger 3D modeling projects.
Let me explain my inspiration for this work now. Part of my inspiration to try low-polygon, low-resolution modeling is based on Minecraft. I want to re-imagine some of my Minecraft experiences to possibly make some kind of side-project. The best thing about this is that making a plane with a texture of a texture atlas is that you don't need to keep unwrapping a plane. Either you can upload an image as a plane, or you can take a plane mesh in Blender and unwrap it easily. Pixel-perfect UV mapping can be done by disabling mip-mapping and snapping vertices of faces to pixels. I see great potential in trying this stuff out.
I later attempted a bigger project. The first attempt was more Proof of Concept, which I normally don't invest in or get excited about. The Simple Room modeling project consisted of 11 tiles (10 of them at 16x16, and one at 16x32). This time, I tried a bigger project. I prepared about what seemed to be about 35 individual tiles for a combination of certain unique textures. I modeled what I called my "Water Temple." I somehow have been on a trip of RPG or fantasy style games. So to cash in, I decided to model the interior of the a Water Temple. Check it:
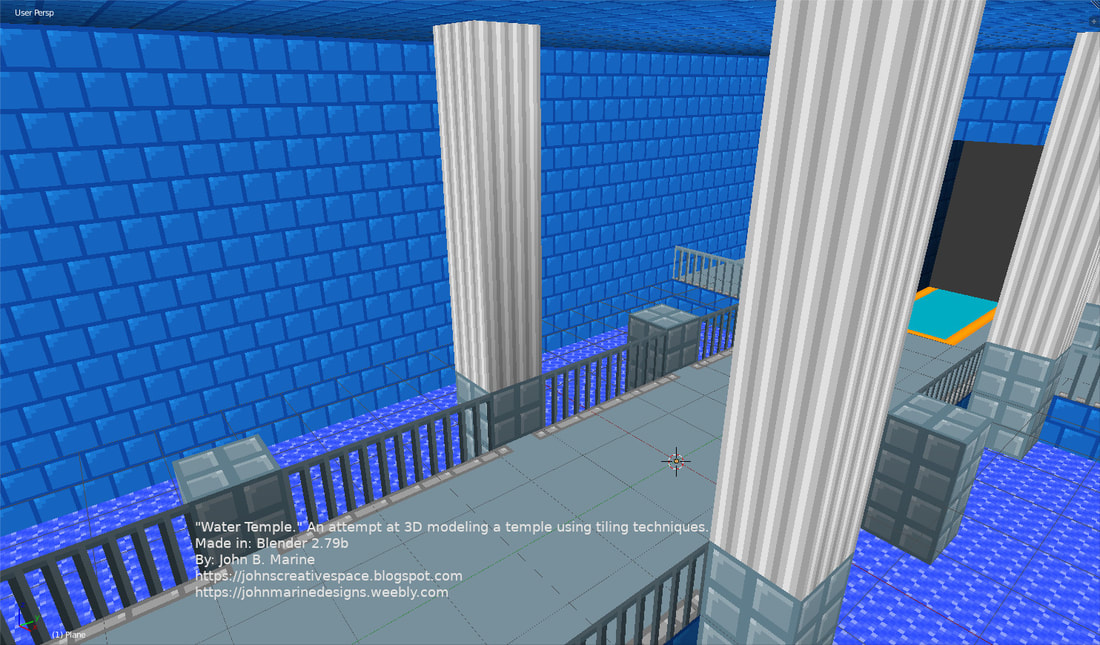
I took my Minecraft inspiration to design the interior of a temple. I used simple textures designed in GIMP for this view.
I was rather pleased with my results, and I actually intended on modeling the throne room to this temple. However, I decided to only stick to this room and not overwhelm my relatively inexperienced self with a much larger project. What I was kind of going for was transparent water and even maybe glowing water. Trying to get the lighting down was rough for me. I still have a lot to learn if I want to make anything really solid.
Take it Outdoors!
So far, I have made tile-type modeling in Blender using mesh planes of certain size tiles. To be consistent with Minecraft, I made my tiles 16x16 for my UV maps. I now wanted to take on a different challenge in trying to gain experience with tile-type modeling. First off, I wanted to practice making a skybox or skydome. I also wanted to make a scene featuring different size tiles. I seemed motivated to design a country scene.
I will get to the skybox first. Some people make a real fussbudget about deleting the default cube in Blender. Almost as if it is a punishable offense to delete the default cube. Well, the default cube is all you need to make a skybox; and there is also a trick you can use to make a realistic sky from a basic cube. You have to properly UV map a cube first and foremost. I can't demonstrate the proper method to UV map a cube to set up a skybox, so you're on your own for that. But once you do find a UV mapping method you can work with, you then apply a Subdivision Modifier to the skybox. You need at least a Subdivision level of 2 for the skybox to appear clean. If you have a set of skybox images to use, align the skybox textures properly for the best appearance.
As for the tiling, I used a combination of 16x16 tiles and some larger tiles to populate my scene. Some things that I wanted to be tall or wide (or both) were set up using bigger-size plane meshes. I used some Minecraft-style texturing techniques to mimic things such as tall grass on one block. My only regret is making everything plain-looking and not adding too much depth texture-wise. Otherwise, I came up with this:
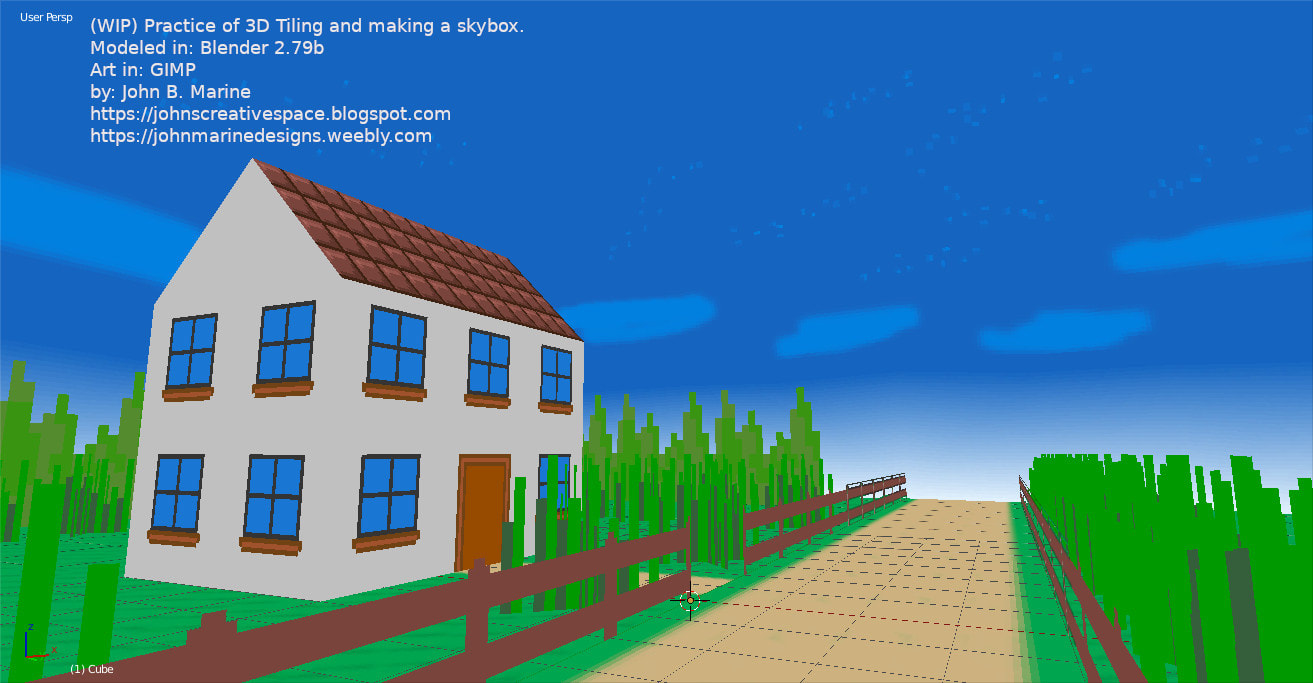
This is my first outdoor scene I prepared using plane meshes and a rudimentary set of tile art. Both the tiles and skybox has art designed in GIMP.
One important thing I learned is that you can set up the scene to be shadeless in Blender. I also found out your textures won't appear missing from different angles if you turn off backface culling. Making the scene shadeless helps ensure you can see everything without needing to consistently adjust light to make textures appear better.
Boo-p!
Thanks to one of my Twitch friends who loves ghosts, I was inspired to make a ghost. I was thinking of doing a low-polygon ghost. Now I want you to know something. This model was NOT created with the 3D tiling or 3D spriting method I been trying to perfect. Instead, it is just simple modeling. I made a simple 16x16 image to represent its color palette. Check out this work that took me about an hour or two:
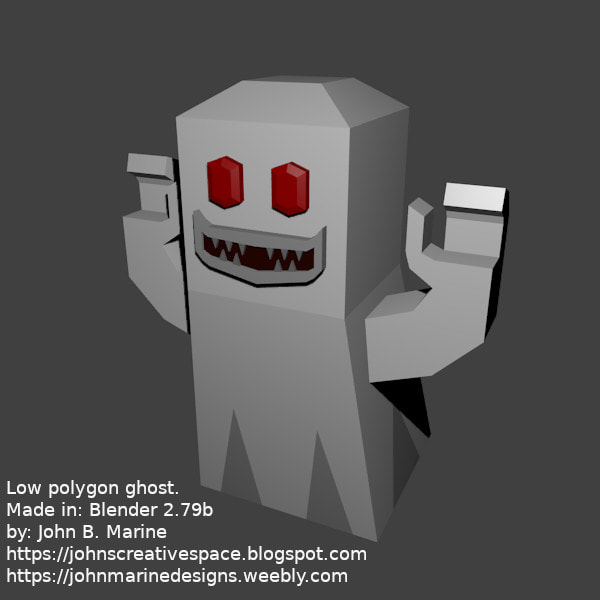
This is a low-poly ghost I created in about an hour or two. It is UV mapped to a 16x16 PNG texture. This model is not rigged or animated.
Simple Human
Detailed models are not what I am good at. I am not going to develop the most true-to-life 3D models. I am even thankful I've developed what I have developed so far. When I was looking to develop a simple human model, I end up making something just a bit too detailed instead. Take this latest run I've developed:
This was one run I had at developing a simple human model.

This was another model I created but with a bit more basic hands. The focus is on simplicity and not on overly complex modeling techniques.
My inspirations were taken from Minecraft, Survivalcraft, ROBLOX, Goldeneye (on Nintendo 64), and the original Tomb Raider. I have no knowledge or skill in head, hand, or feet modeling; so I decided to keep things basic and wait until taking on a more exciting modeling project. I don't really have any real way to test out some of these models.
Design Study: 3D in 2D and IK Practice
Okay... while it may not be true pixel art, I did try my hand at 3D-style 2D. I learned some techniques on how to make pixel-art style renders after watching a couple of YouTube videos. The picture below was meant to be a character I wanted to use in making pre-rendered 3D characters for MUGEN. Check it:
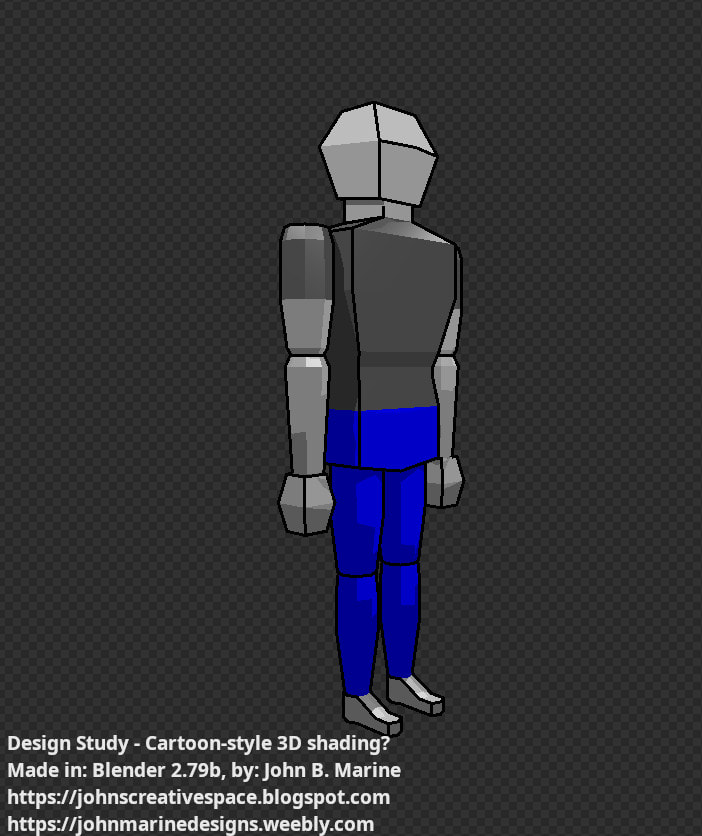
This picture is a design study in wondering how I could accomplish designing pre-rendered 3D as well as cartoon-style models.
In addition to practicing pixel art-style 3D modeling, I also rigged this model with an armature. I tried to learn how to do inverse kinematics (IK). Inverse kinematics make 3D animation easier once you set up an armature for a model. What I learned was how to make usually a middle set of bones react properly to an IK setup. However, the problem lies in trying to properly set up a smooth IK setup. Where I struggled was in trying to use helper bones and pole bones to properly enact the proper bone setup.
This model was created entirely out of loose parts. The only real attached part is the torso. The arms, hands, legs, feet, and head are loose parts. I nearly have it structured like a lot of older 3D games where the models are constructed of mostly loose parts. I felt this would make weight painting easier. Once set up with automatic weights, only the body (excluding the arms and hands) had unique weight painting for the corresponding bones.
If I create a future character model in this style, I may make the entire model completely out of loose parts. Even if to look like certain Minecraft or ROBLOX models, I am at least establishing a set aesthetic.
Get Real!
Realism is not anything I am entirely dedicated to. However, I do need to have some kind of realistic modeling experience. I followed a modeling tutorial from a YouTube channel called PIXXO 3D on how to model a human foot. I tried to stay focused and try to act out as much of the 3D foot as I could. My end result? This:
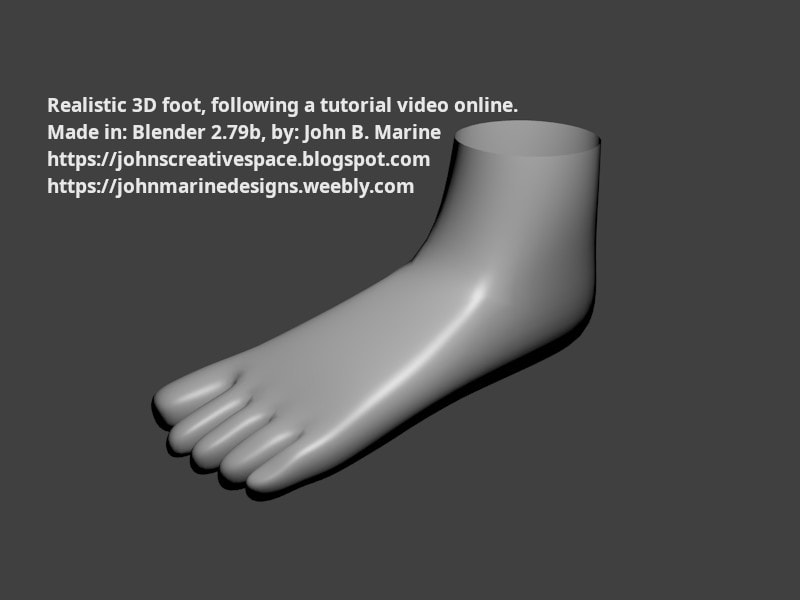
This is my best attempt at modeling a realistic 3D human foot. It was based on an online video tutorial I followed.
Voxel-Inspired Modeling (not exactly pixel-perfect)
Upon examining models I exported out of Magicavoxel, I found there was a sort of measurement I could use to develop voxel-style models. When you convert a voxel model into certain 3D formats, they are no longer voxel models. You turn a voxel model into something that can be refined as much as you like and to the best of your skills. The reason why I didn't initially want to sell my voxel models was because I felt I wasn't doing too much making something in one program and then finishing in another. Now in Blender and through a study, I felt like I could make voxel-style models from start-to-finish in Blender. I also can do a lot more through this unique method.
It began by making a model in Magicavoxel and exporting it as PLY format. Once I studied the model I exported, I noted the measurements in Blender units was 0.1 blender units. Rather small. However, it gave me an idea. What if I could develop voxel-style art through Blender? What if I could take a simple cube and make a voxel-style model through a series of duplicating and extrusions? This honestly re-ignited my creative energy.
Oh, and for those of you who love to complain about deleting the default cube in Blender, I KEEP THE DEFAULT CUBE THROUGH THIS PROCESS! Anyhow, here is one such model I developed using this method:
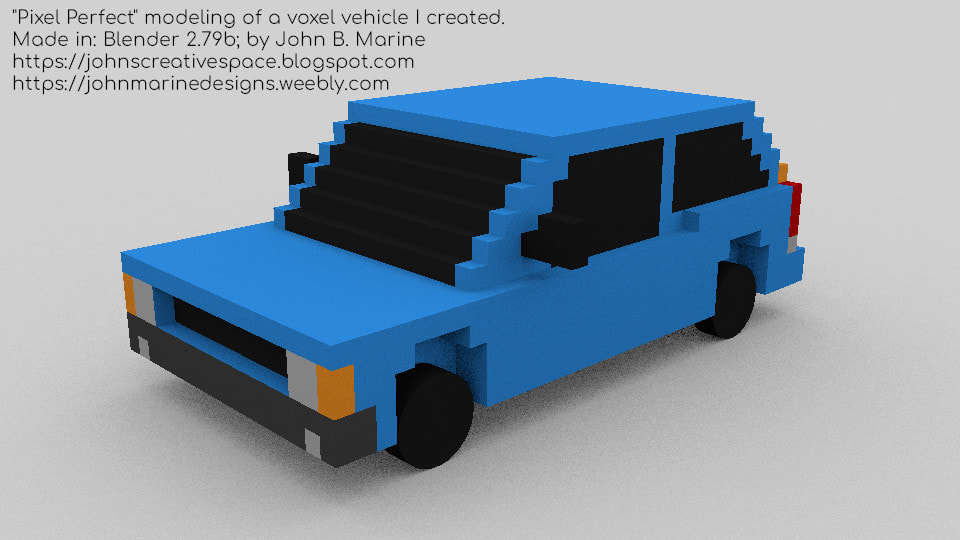
This is a voxel-inspired re-creation of one of my voxel vehicles in Blender. This method was previously called "pixel perfect." Read on to find out why I changed that technique's name.
This model is one of my voxel vehicles I re-created cube-by-cube and added some rudimentary wheels and tires. I used my palette I developed with GIMP to texture the car. I was not using the default Magicavoxel palette. You can see some elements of this voxel car are not possible with basic voxels. For example, check the front grill of this car. All voxels share the same color all around a cube. Each face of a true 3D model can essentially be textured any way you please. This opens the possibility for which to make blocky models or use the blocky models as de facto base meshes to make more advanced or detailed models.
Now when you look at the picture, note I called this method "pixel perfect." Well, there's a reason why I stopped calling this technique that. In Blender units, a pixel is about 0.0625 Blender units. A measurement of 0.0625 is accurate for a pixel on a screen. When I tried to model with something this small, I ended up having a tough time trying to 3D model properly with such small measurements. Pixel-perfect means modeling using 0.0625 edge polygons. Since 0.1 Blender units worked better for me, I used that instead. The end result is still a set of charming voxel-inspired models.
I was on a roll, so I developed three more models using this method. Check them out:
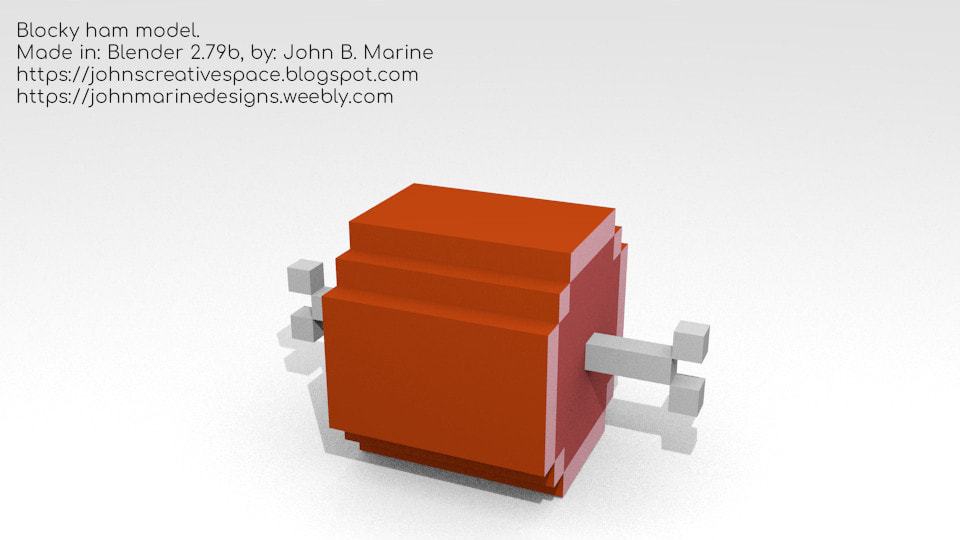
I made this blocky 3D ham using my voxel-inspired technique.
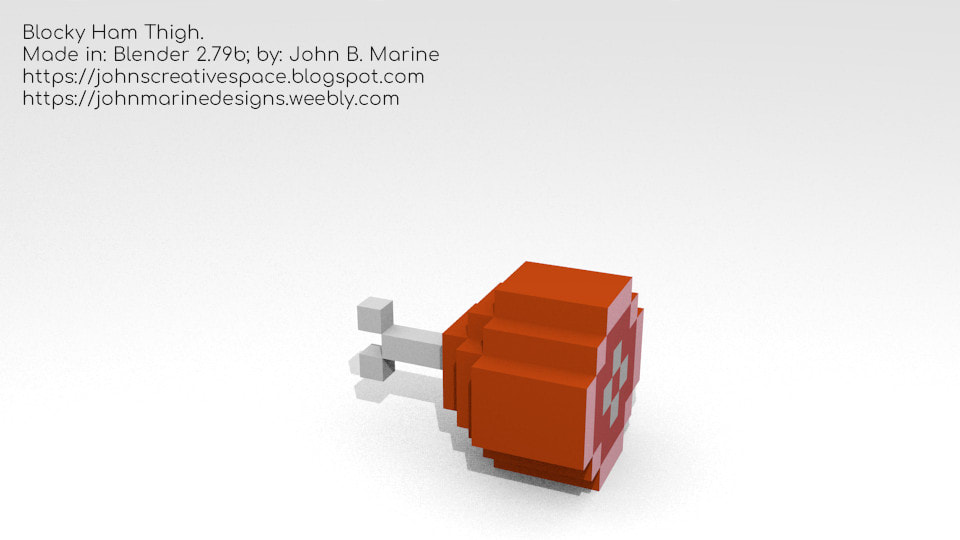
This is a voxel-inspired ham leg.
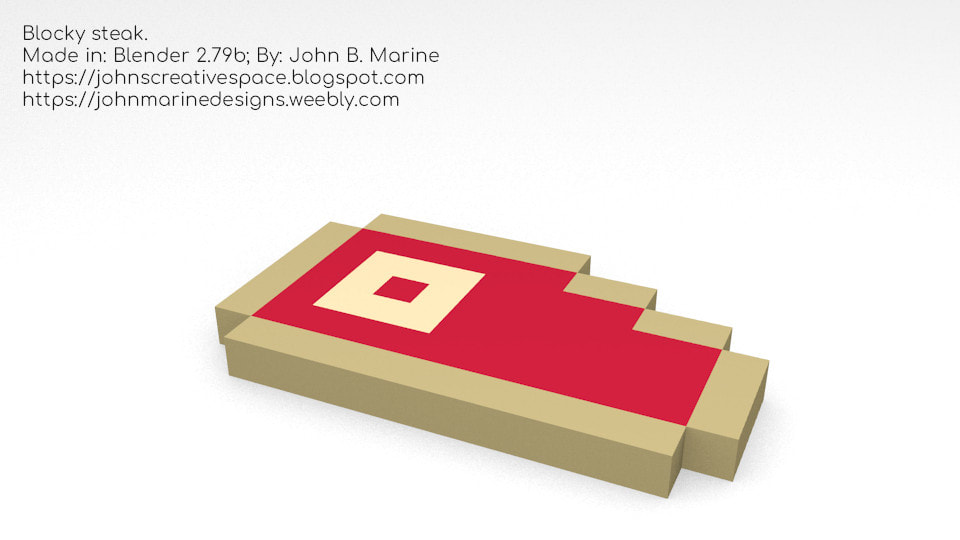
I made this blocky steak slab using my voxel-inspired method.
I have a set of ideas with this modeling technique that may allow me to design more interesting material in the future. I'm hoping this becomes my true breakthrough in making great 3D models. Voxel lovers may hate that I take a voxel model and no longer make it a voxel model. I may also be criticized for making a "fake" voxel model using this method. At the same time, though, using this method can seem like making a rough draft or base mesh of some model that will become much more refined than in its blocky form. I have some versatility in this regard that I hope to capitalize in future models using this style.
As you can tell, I have had a long road to try to make 3D models. While I am still learning and still practicing my skills, I feel I can only get better as a 3D modeler. I'd like to thank you for visiting my portfolio of 3D models.
Did you know I am offering some of these models for download and/or sale? If you want to see my material I am offering, I introduce you to them in the 3D Model section of my store. Click if you are interested.
Did you know I am offering some of these models for download and/or sale? If you want to see my material I am offering, I introduce you to them in the 3D Model section of my store. Click if you are interested.
