
JMDesigns: Game Development |
Game development highlights and insights are featured in this post.
|
Welcome to my game development portfolio! This is where I offer some of my own insights on game development. Please note that any work featured here is mostly work-in-progress and exhibits my skill and progress at the time of the post.
Godot Game Engine
Godot is one of many different game engines designed to develop games with. While Godot is no Johnny-come-lately, it is fast becoming one of the most powerful and easiest game engines to anyone seeking alternatives to Unity or Unreal Development Kit. Godot is a free and open-source game engine. While Unity and UDK are also free, your game is good for commercial and non-commercial use. In other words... you own your own game and can financially profit as much as you like for it with Godot. You even can port your Godot creations to a variety of different platforms, including (but not limited to) Android, Blackberry, iOS, Windows Desktop, and more.
I honestly never had the patience to try to learn Unity. I felt too lost trying to make even something simple. So when I learned of Godot and saw a number of videos on it, I felt very confident I could finally create some games with it. Try Unreal Development Kit was nothing I was too adept at. And really, UDK seemed slower than Unity, so I retired any such work with the Unreal engine. I had to try to learn Godot first before seriously committing to designing proper games. Both 2D and 3D games can be made with Godot. 2D is easier with Godot than it is with Unity.
For my Android ambitions, I am considering a workflow that consists of Godot with my OUYA and maybe even my discontinued Google Nexus Player. I am considering getting a Xiaomi Mi Box to replace my Nexus Player so I can continue to entertain the thought of Android TV game development. The goal is to try to make Android games for Android devices as well as for Android TV.
Learn more about the Godot Game engine by visiting godotengine.com .
Godot: Learning the Engine
Part of my early confidence using Godot came in the form of learning from a 2D gaming tutorial. After practicing my craft, I felt I had my first look at what I am capable of in designing my first game of any kind. You can only improve after you successfully create something, even from a tutorial. So my first order of business was to try to come up with my own platform game. This was a step in developing this work:
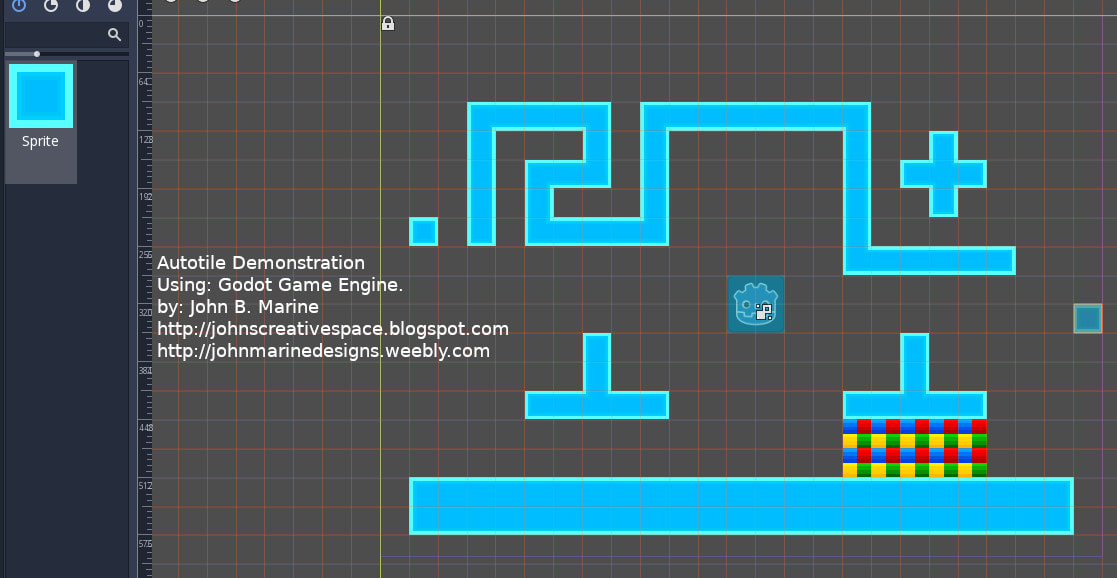
This is me practicing making an Autotile setup. What looks like a well-structured series of tiles designing one level is really just one 48-tile map with 32x32 tiles. Pay no attention to the colored area- that was meant to be a pass-through background element.
I used a template to design a series of 47 tiles for an Autotile. Autotiling involves making one tile as the base that can then be used to automatically build levels without having to design everything by hand through a series of carefully-placed tiles. The tiles were all designed in GIMP. I made my own template for which I can envision creating my own Autotile sets for possible gaming assets.
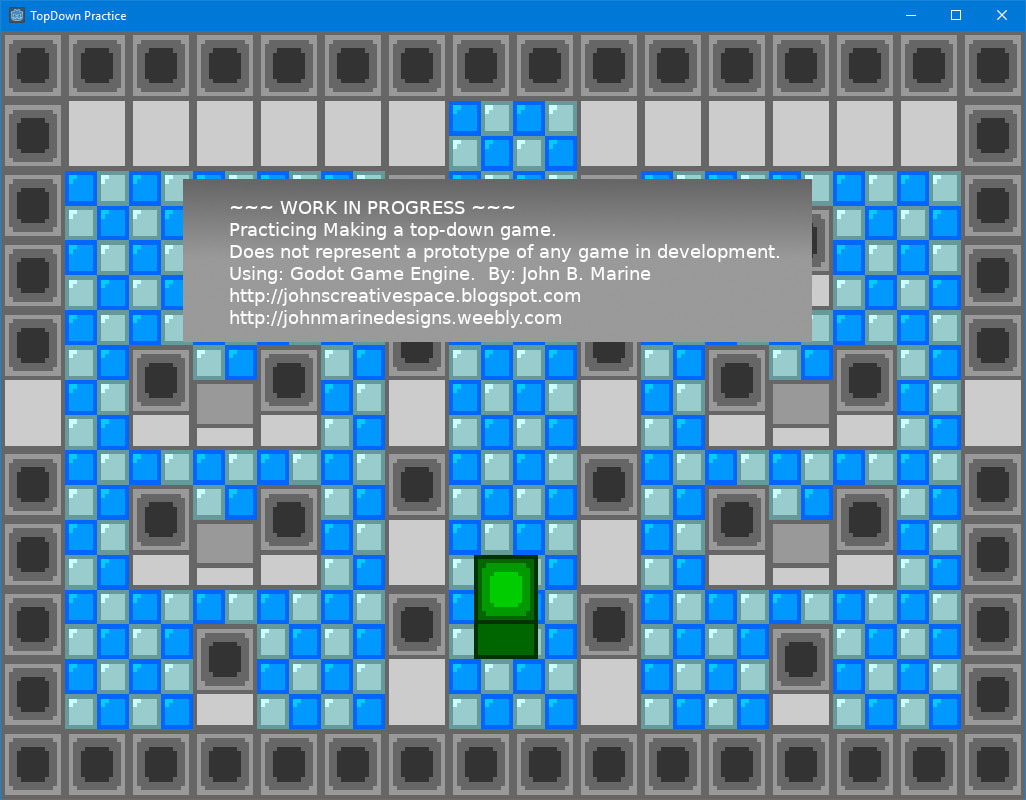
Through a series of YouTube tutorials, I practiced making some kind of 2D top-down game. This was my best result after trying so much.
Part of my personal Godot training involved making a top-down game. I did have an idea lined up for some kind of top-down game. I put my ideas into practice by learning from a series of tutorials.
By now, I have grown to be somewhat confident to make my own game after trying a series of tutorials. It is all about taking what you learned and applying them all to make something special. I am not yet at that level. However, with each sort of tutorial and any other online literature in the realm of tutorials, I am becoming more confident in finally developing and creating my first proper game of any kind.
By now, I have grown to be somewhat confident to make my own game after trying a series of tutorials. It is all about taking what you learned and applying them all to make something special. I am not yet at that level. However, with each sort of tutorial and any other online literature in the realm of tutorials, I am becoming more confident in finally developing and creating my first proper game of any kind.
Godot Game Engine - My Portfolio
What you are about to see are my own works and thoughts regarding different kinds of material created in Godot.
Godot: 2D Platformer ("Project Antoinette")
Many people look to the Super Mario Bros. series and Sonic the Hedgehog series as the premier examples of platformer gaming. If you are not a gaming person, a platform game primarily involves going around levels that involve a lot of running and jumping onto platforms. Some even offer elements of puzzles to keep things interesting. While I never really had a proper project lined up for platforming, I have at least tried my hand at learning the Godot engine to make material for it.
I am someone who tends to look at little-known or not-very-good games as a basis for trying to create my own content. My platformer insights mostly involve the Mario games and Sonic games.
I am someone who tends to look at little-known or not-very-good games as a basis for trying to create my own content. My platformer insights mostly involve the Mario games and Sonic games.

"Project Antoinette" is designed as a prototype towards the development of 2D platformers. I designed this art.
Godot: 2D Metroidvania
A Metroidvania is a gaming term we use to describe games molded along the lines of Metroid and Castlevania. Hence the collective name "Metroidvania." A big part of these two gaming franchises involves enhancing the main character by collecting items and often times backtracking. The one challenge of building a Metroidvania is to make a game that doesn't require the player to backtrack too much to where things get tedious and repetitive. In addition, levels in Metroidvania games are often massive. This is good to provide a maze-like atmosphere and to ensure you don't seem to enter the same places too often.
Godot: 3D Voxel Racing ("Project Rhiannon")
I did not have any skill in working with 3D in Godot Game Engine. Only recently (as in July 18, 2018) have I considered working with 3D models. A past project I had in mind was to have a voxel style racing game. The inspiration came from an independent (or "indie") game called 3D Pixel Racing from Microforum. I wanted to make a possible racing game under the code name "Project Rhiannon." Here is a MagicaVoxel render showing my idea being put into practice:
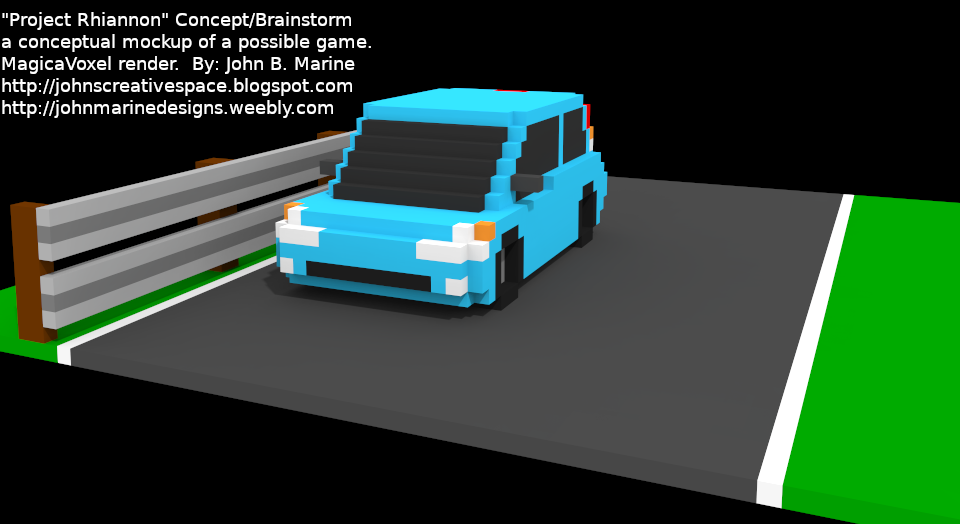
This is a conceptual mockup of "Project Rhiannon." Project Rhiannon is a racing game project.
Further progress with "Project Rhiannon" was made as I was better able to make my own driving model as well as better learn the Godot Game Engine. The driving model was based on various Godot projects I downloaded and studied. The real key in learning everything was to learn scripting as well as modifying VehicleBody and VehicleWheel variables.
"Project Rhiannon" is turning more into trying to make a voxel-based racing game. I made a series of titles using MagicaVoxel that I could use to make modular race tracks. As I started getting more and more ideas, I came up with more tiles. An important aspect of designing these tracks is in making the proper model towards collision modeling. This was one of my first efforts in making voxel tiles:
"Project Rhiannon" is turning more into trying to make a voxel-based racing game. I made a series of titles using MagicaVoxel that I could use to make modular race tracks. As I started getting more and more ideas, I came up with more tiles. An important aspect of designing these tracks is in making the proper model towards collision modeling. This was one of my first efforts in making voxel tiles:
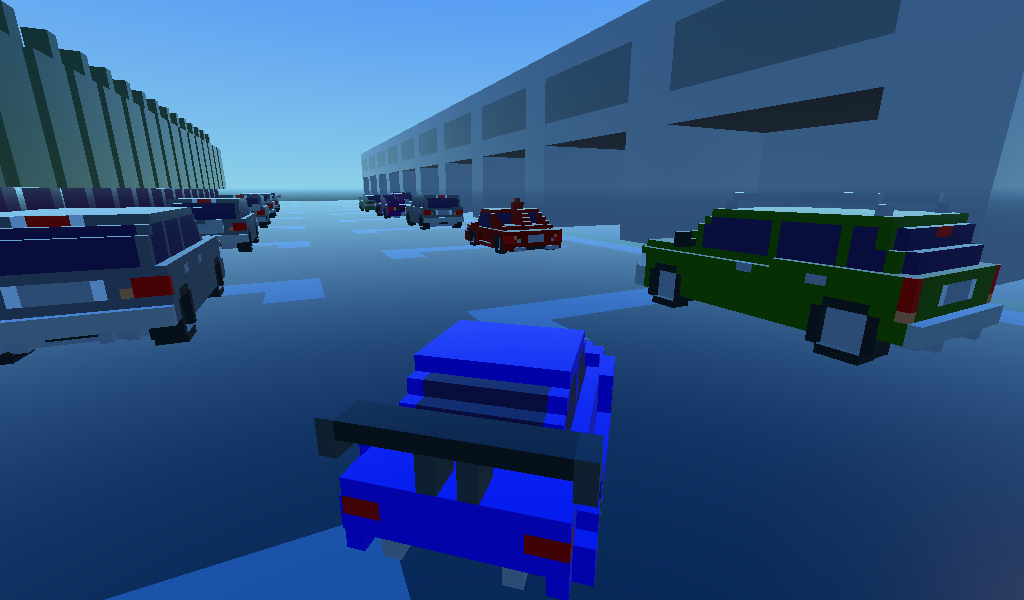
I made both the voxel world model and am using these cars from past MagicaVoxel modeling to get an idea of how to make my voxel world.
I realized later that the only reason why my voxel world had decent collisions was because I had used a plane as my collision base. Once I removed it, my test car fell through the voxel realm. I later learned how to easily apply collision models to the voxel tiles. Something I had to keep in mind is that if I changed the voxel model, I have to remove the previous collision model and make a new one. The most effective collision model for those voxel tile models was a Static Body followed by a Trimesh Collision Body. You could do this easily by selecting a MeshInstance in the Outline and then click on the "Mesh" menu. You then go down to "Create Trimesh Collision Body." Once I started getting better making tiled worlds, I came up with something like this:
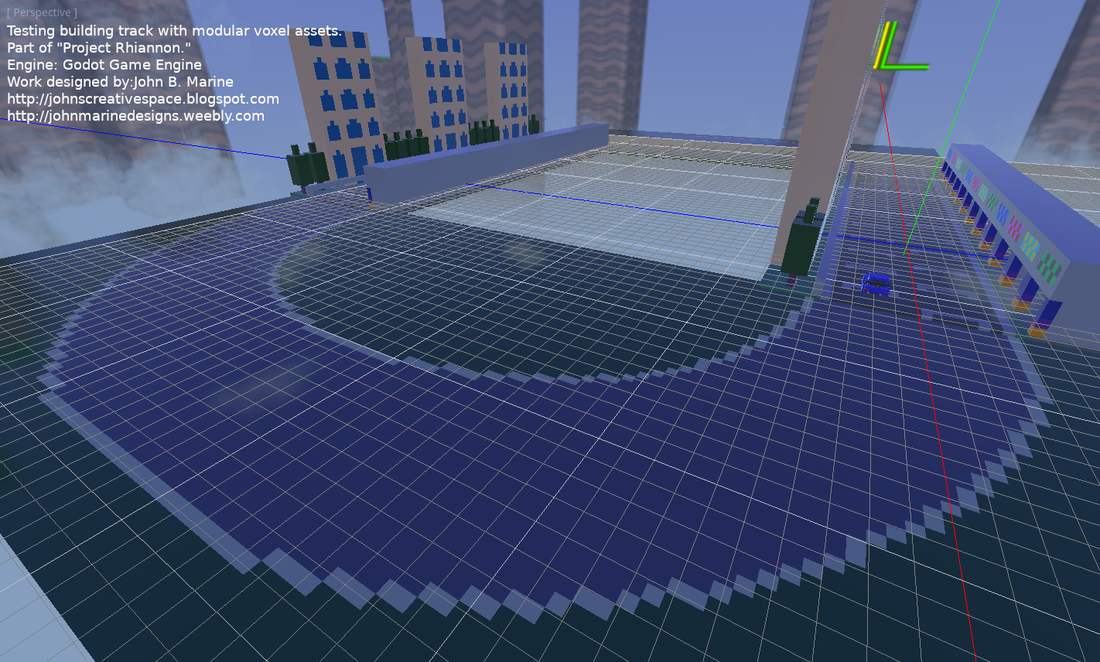
This was one of my first attempts at making a voxel level. The tall buildings were to get an idea of how high I can make things. The largest dimensions mostly are 32^3. Though MagicaVoxel has max dimensions of 126^3, I restricted myself mostly to a maximum of 96^3. However, I do open the possibilities of making proper modular assets to go with bigger size scenery.
As I better became experienced with Godot, I tried making some more advanced material as well as enhance the driving model. I then came up with trying to create different racing experiences to enhance the feel of this project. So what I did was create a slalom tile. Take a look:
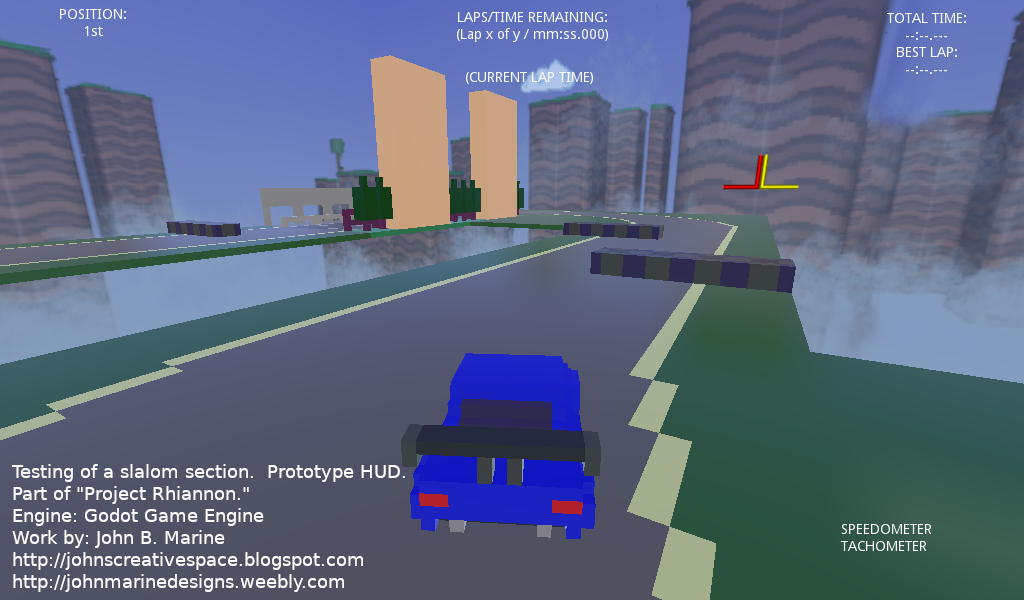
I am heading into a slalom section I created in MagicaVoxel. This is a road with tire barriers to weave through. Also note the experimental heads-up display (HUD) in this picture.
I made two different tiles in GIMP before putting them into MagicaVoxel. One was a 32x32 tire slalom, and the other was a 32x64 tire slalom. The 32x32 tire slalom proved too small and too slow for my racing. So I retired that 32x32 model and went with my 32x64 model for slalom sections. I even made another slalom more suited towards autocross-style racing. Instead of tire walls, I made some cones. Since I don't know how to properly code objects and hitting objects, the cones are indestructible. Yeah- titanium cones! :)
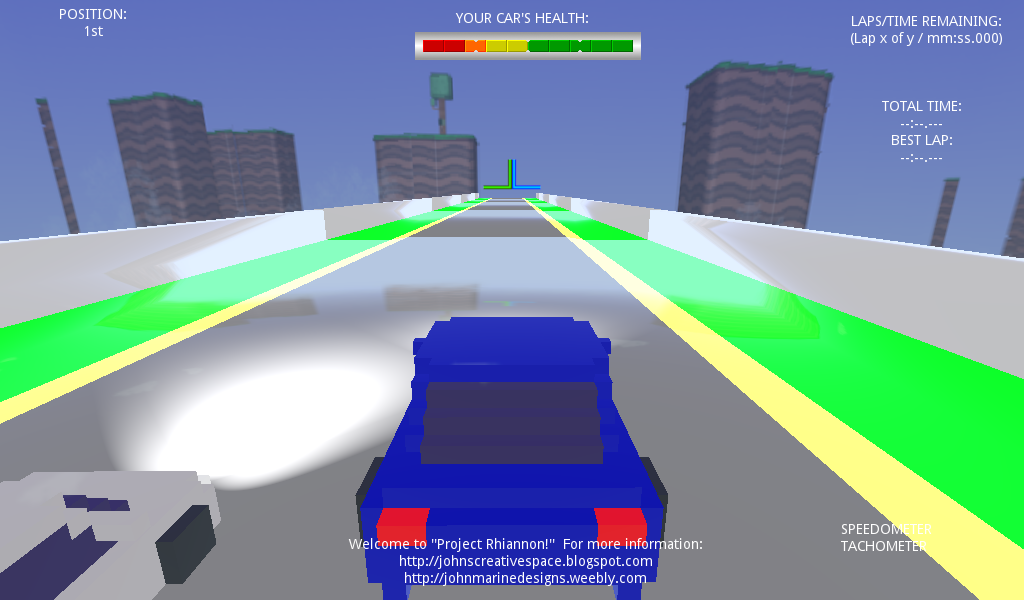
One thing I learned about the VehicleWheel dynamics is that certain variables can totally determine the performance of your vehicle. For example, the Wheel_Friction_Slip variable can be used to adversely affect the handling of a vehicle. I even modified it to where I felt I had more control of a car than usual. However, I also set it a bit to where I had to be careful not to spin the car out. I surely will make various cars of different handling types once I start getting on a roll designing cars through "Project Rhiannon."
One thing I learned about the VehicleWheel dynamics is that certain variables can totally determine the performance of your vehicle. For example, the Wheel_Friction_Slip variable can be used to adversely affect the handling of a vehicle. I even modified it to where I felt I had more control of a car than usual. However, I also set it a bit to where I had to be careful not to spin the car out. I surely will make various cars of different handling types once I start getting on a roll designing cars through "Project Rhiannon."
While voxel cars are still used, this picture features a polygon road as opposed to voxels turned into 3D meshes.
As I began to try making a 3D mesh of a track, I tried a handful of techniques to try to make some 3D race tracks. I kept my voxel cars because I don't have a proper 3D car to do testing with. So it meant I had to try to learn ways to build a practical race track.
A 'practical" race track in this context means something that could properly be implemented in proper games. These include the likes of rFactor, Automobilista, Assetto Corsa, and others. These could also be tracks that can be implemented into its their own racing games. You have to have a certain hierarchy to implement most tracks into most games. Since I have never designed a proper race track for a game, I had a lot to (obviously) learn.
Once I tried doing modular assets, I thought it would be a bit too much work. When I tried to work with Godot Game Engine, the engine has kind of a strange deal of making models fairly shiny. It almost made things a bit like I am racing on rain-slicked roads. Either way, I had an interesting time to try to learn to model a proper race track to race in a game.
My Unity3D Portfolio
One reason why I chose Godot over Unity3D was because I wanted to feel like I actually owned my own work. After a while using Unity3D, if your program reaches a certain annual threshold, you will be required to buy a higher Unity3D license. You are still using Unity3D; just that now you have to take bigger cuts of your Unity3D revenue. Though my Unity3D experience is limited, I have made only a few strides towards using Unity3D for game development.
Unity3D: Race Track Testing
For the longest, I have had no legitimate way of testing my race track designs. Early thoughts began with using Blender and hopefully using the Blender Game Engine (especially with Blender 2.79b) and trying to have an all-in-one suite for testing my 3D race track meshes. This only worked to a small amount of success. After trying to learn Unity3D, I then had myself a test towards properly prototyping a racing course. So what I did was export a rough draft of a track I developed in an hour or two and then exported it to Unity3D. I later used the sample assets Unity3D provides just to get a general idea of the prototyping process. Take a look below:
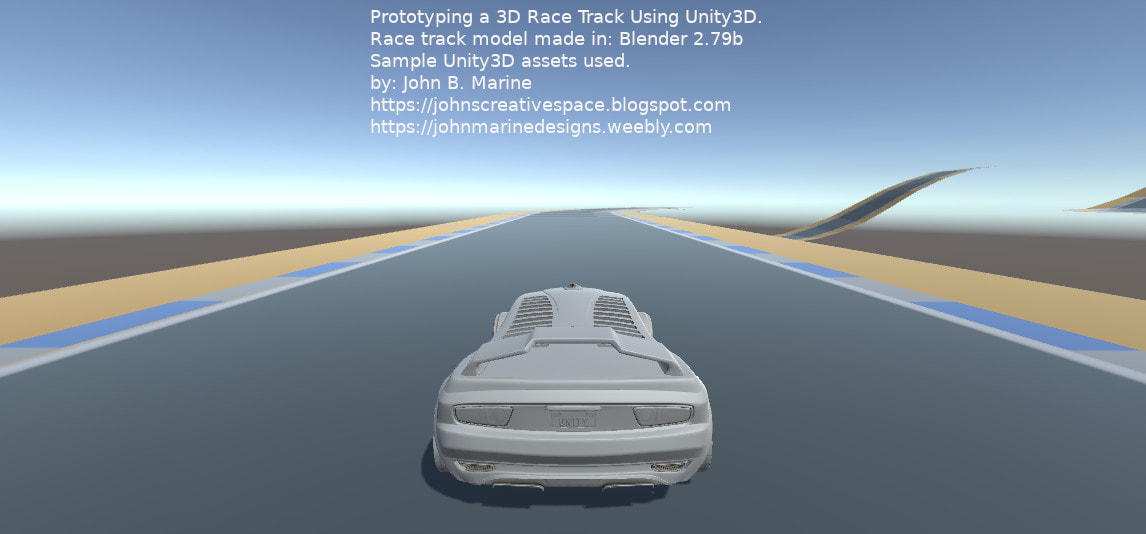
This is my first attempt, and my best attempt so far, of taking a track I modeled and imported into Unity3D. The default vehicle assets were used. The car is the Unity3D Skycar default driving vehicle for Unity3D.
The track had to be scaled up to a vast degree so it didn't seem like the default car (Unity3D Skycar) didn't swallow up a small race track. In the driving process, I kept almost every prefab setting stock except for turning down the car's speed from 150 to 50. The steering seems a bit too strong. Oh, and as if you can't tell, there are no collision boxes or anything on the sides of the track. So if you drive poorly, you're falling forever. One thing I did want to consider is subdividing the track. The road style and terrain did not seem to flow properly or feel smooth when I tested my design. So I may want to change that in testing future courses using my Blender and Unity3D workflow.
As for the textures, all of the textures I used were all in one PNG file. I tried initially at a 64x64 image, but the road texture I applied seem to not look as good. So I upscaled it to 256x256. I kept the textures basic because (1) I did not want to rely on stock images and more proper textures, and (2) I needed practice in texturing and modeling. It is therefore as basic a model as I can conceive.
As for the textures, all of the textures I used were all in one PNG file. I tried initially at a 64x64 image, but the road texture I applied seem to not look as good. So I upscaled it to 256x256. I kept the textures basic because (1) I did not want to rely on stock images and more proper textures, and (2) I needed practice in texturing and modeling. It is therefore as basic a model as I can conceive.
Do You Want My Gaming Assets?
If you would like to acquire these assets, you can visit my OpenGameArt profile at: opengameart.org/users/johnm25. You can also visit the Gaming Assets portion of my JMDesigns store.
If I create more gaming assets, I will be sure to share them with you all here on this page as well as in my other online content.
